Tuesday, January 31, 2012

From the Ground Up

Groundhogs day is just around the corner. . .literally it is in one day (February 2nd). I wasn't planning on doing a groundhogs day post, but I happened to make a comment to a fellow worker the other day about Groundhogs day only being so-and-so many days away, and his reply was, "Who cares about Groundhogs day, and what is it even about?" Well, if anyone knows about me and holidays, and I know there are people out there who have gotten caught in my holiday excitement, they know I love all holidays. I love those oddball days of the years that everyone forgets about. For example in high school I celebrated "Name Day", a Czech holiday. In Czech Republic there are designated days for each name, and they celebrate it. So I celebrated my friends name in high school. I baked her a cake for "Denisa Day". Holidays are just too much fun, and why would you choose to spend your day thinking it's not a holiday when it can be a holiday? Anyways I am getting off track. So, I am not going to go in long detail about what groundhogs day is about, you can find all that information on the internet somewhere.

But sure enough Cameron and I did take some time today to do a groundhog activity, and to make a groundhog themed treat. The activity is one I did last year during my story time at Barnes and Noble. The kids loved it then so I thought why not do it again.

 "Pop-Up Ground Hog"

Supplies:
- paper
- glue
- pipe cleaners
- styrofoam cup
- markers
- popsicle stick
- crayons
- googlie eyes
- scissors

1. Poke a hole in the bottom of the styrofoam cup, and then let the child color the cup as desired. Use crayons for the cup, because marker takes a while to dry on the cup, and can quickly get everywhere.
These are the shapes needed to make the actual groundhog.

2. Cut the paper into the shape of the ground hog. Then glue them together, and let the child help place things to together. Draw the face on the ground hog, and then glue on the googlie eyes. These take a little longer to dry you will need to hold them in place for a minute. Then glue the pipe cleaners onto the face.
Cameron's groundhog of course is pink!
She was having the groundhogs talk to each other it was really cute!
3.  And lastly glue the popsicle stick onto the ground hog and push through the bottom of the cup.

"Groundhog Cupcakes"

You can use any kind of cupcake for this, earthy colors would probably look the best. And I just used candies to make the groundhog. Simple enough!
 Have a Happy Ground Hogs day and let us hope that he does not see his shadow this year. . .that means that spring will have sprung early. Not that this hasn't already happened!

Friday, January 27, 2012

From Blonde To Brunette

For the past few years I have been coloring, and highlighting my hair. I finally decided to become all natural. I have never colored the underneath of my hair so I just went off of that color to use for the hair color. Shockingly my hair is much darker than I was expecting. I have officially gone from blonde to brunette. I have not decided if it was a wise choice yet. Hopefully within the week I will have accepted the idea, and like it. If not, it's back to blonde!

Before

The brown is my natural color, and the blonde is what I have been coloring my hair!

After

Before I colored it this week I did have fun doing some exciting braids. This one happened to be my favorite.


I also did do some fun crafts this week, but I am waiting to post them until after valentines day, because they are for a special someone and I don't want them to see it yet. So sorry, you will just have to wait!

Thursday, January 19, 2012

Pinkalicious

      Pink is a term that girls are born to love! Or at least I was one of those little girls, and so is my daughter. She could swim in pink and her day would be set. If a little girl sees something sparkly, and pink in a store it seems to be instinct to want it. If I were to ask Cameron if she wanted a new black dress for her baby doll, or a pink frying pan for mommy she would probably choose the pink frying pan, because. . . it's pink!

Pink Things I Love!
Strawberries and Creme Frap. (Starbucks)
Pinkalicious [Book]
Pinkalicious (Barnes and Noble)
Strawberry Shortcake Cupcake (Billy Vanilly in Topeka)
Miss Piggy Fingernail Polish from The Muppets (Walgreens)


Toddler Uggs (Dillards)
     This weekend we celebrated my cousin's 4th birthday. She is just like most girls, loves pink, and is a true Princess at heart. So while I was out and about shopping for her birthday I was set on the idea that I was going to buy her a boa scarf with a fairy wand. If you have ever gone shopping for a wand you will soon find out that there are many wands to choose from and the majority of them look extremely cheap. I wanted something big, sparkly and pink. So my mission was on, I had to find one that had all of these qualities. Needless to say I never found one, so I decided to make one. 

     This activity can be done with a child, and you can make it as big, sparkly, and as unique as you want. It's a very simple activity, but very messy! Do this while Daddy is not around...Wink!

Fairy Wand!


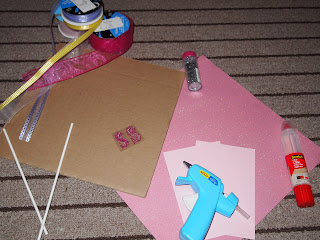
Supplies:
* Cardboard
*Loose Glitter
*Fun Girly Paper
*Ribbon
*Craft Stick
*Scissors
*Hot Glue Gun
*Tape
*And anything else you want to add!

1. Draw a star on the cardboard. Cut it out, and then trace the star you just cut out onto another piece of cardboard. The funkier the shape of the star, the more awesome it will be!
     *Parent you will need to help with the cutting.


2. Place the craft stick onto the backside of one of the stars, and tape down. Make sure that it is taped securely. Then place the two stars together with the right sides out. Tape around the entire edge of the star so that it will hold it together.


3. Trace the stars on to the fun paper you have chosen so that you can make the star pretty. I chose sparkly pink paper. Trace onto the side of the paper you will not see, so that you can't see the tracing lines. Cut the paper out, and then glue with a glue stick onto the cardboard.
     *Parents once again you may need to help with the cutting, and glue placement.


4.  Now we need to wrap ribbon around the craft stick. Choose which ribbon you want to use, and using the hot glue gun place a small dab of glue at the top of the craft stick where it meets the star. Then begin to wrap the ribbon around the craft stick. When you get to the end place another small dab of glue near the end and wrap ribbon over glue.
     *Parents you will need to do the hot glueing. This glue can get very hot!


5. Now choose a few pieces of ribbon and cut to the desired size. (You probably won't want it too much longer than the wand itself.) Once again put hot glue around the top of the craft stick near the star and wrap the ribbon around the glue. (Make sure that all the pieces of ribbon get glued down. 


6. I then added hot glue around the entire edge of the star. (Where the stars are taped together.) I didn't like being able to see the cardboard. I then at this point added loose glitter to add extra sparkle, and to hide the cardboard. Do a little at a time. The hot glue dries fast, so you will need to only do a small amount at a time. 


7. Finally I added an "S" on the front since my cousin's name starts with an S. You can add all you want to make the wand even more awesome!


8. Now let your little Princess enjoy!

I told her to smile and this is the face she gave me!


Recently Shelved:


"Shatter Me"
By: Tahereh Mafi


Love, Love, Loved this book! I highly recommend it. It relates to the X-Men
 in a way with the whole 
girl who can suck the life out of you with a single touch, etc. It starts 
out with a girl who has supernatural 
powers and is considered a freak for being 
this way. Civilization puts her away in a psych ward in hopes that
 this will just rid the world of her 
ability. The civilization soon goes to war with pretty much itself, and they realize
 they may need her after 
all. She has to make the decision to help her civilization and use her powers for evil,
or go against the society and risk death. This will be a book you will not soon forget.


Sunday, January 15, 2012

Coffee Collars and Chocolatey Pretzels!

     About 6-7 years ago I read a novel, but I can't remember the title or author, and to tell you the truth I can't tell you a whole lot about it, but I did pull one thing out of that silly romance, and it's called a "coffee collar". The author had in a way coined the term for the little cardboard sleeves that hug your piping hot cup of joe. At the time I assumed that was what all coffee connoisseurs called them. Well, I was wrong! A few years later I was at my new job as a barista, and my first day there I wanted to impress my cute fellow worker. So I commented on the "coffee collars", and asked where they were stored. "The what?" was his confused response. He had never heard or used that term in the 10 years that he had been a barista. And now 3 1/2 years from that embarrassing moment I still use that term. The greatest thing about that story is that that cute barista that laughed at me, and who still happens to laugh at me when I asked for one is now my loving husband.

     So, anyways, I decided to make a coffee collar by using the cardboard sleeve around a Starbucks coffee cup as the template. It was really easy and fun!


COFFEE COLLAR

What you will need:
  • sewing machine
  • hand sewing needle
  • thread that matches fabric
  • 2 different fabrics ( I just used scraps that I had from other projects)
  • badding
  • cardboard coffee collar from a Starbucks cup as a template
  • pins
  • white colored pencil

1. Use the Coffee Collar as a template. I used a white colored pencil to trace the outline.
I added about half an inch on the top and bottom edge. When cutting out the badding make the side seam a little shorter, about half an inch.

My finger is pointing at the bend in the cardboard. This is where you should cut the badding at instead of at the end.


2. Pin the fabrics together. Right sides out! Sandwich the badding in-between. And sew along the top and bottom edge.

3. Fold the fabric in half with the side seams together. Make sure that the inside seams face out. Sew along the inside seam. Turn the coffee collar out.

4. Cut 2 strips of the inside fabric. They need to be the length of the coffee collar, and 1 1/2 inches in width. Press the outer edges in 1/4 of an inch. Pin the strip onto the coffee collar and hand sew it onto the coffee collar. 

5. Enjoy coffee with your new coffee collar!

Be Aware: This coffee collar will not fit all coffee cups. I figured this out quickly! But it will most definately fit a Starbucks coffee cup. You may want to make it a little larger so that it will fit a few other generic coffee cups.


A FUN VALENTINE TREAT


This picture came out bad, I forgot to turn the flash on!

     I made this fun snacky, dessert item for a card party that my family had. You could change the color of the sprinkles or candies to make this for different holidays.

Ingredients:
  • pretzels (I wanted to use square pretzels, but I couldn't find them in the store)
  • chocolate melts
  • sprinkles or candies 


1. Preheat the oven to 250 degrees.

2. Place the pretzels on a baking sheet, and then place the chocolate melts on top of the pretzels,
centered.


3. Bake the pretzels for 5 minutes, or until the chocolate has melted, but not enough to run off the pretzel.

4. Immediately sprinkle or place candy on top of the chocolate melt. Place in freezer so the chocolate can harden back up. 5 minutes should be enough time to harden the chocolate back up.


Recently Shelved:

Glow
"Glow"
by: Amy Kathleen Ryan
Spaceships 
Romance
War
and the ultimate battle between the struggle if God is of existance!
I loved this book! The only downfall was that the book switches points of view. One chapter is from the religious point of view and then another would be from an atheist point of view. I felt like I needed to convince this character that there is a God. At certain points I wanted to stop and scream! But in the end I felt like my faith was in a way stronger.

Tuesday, January 10, 2012

Tea Cakes, and Cookie Bowls


       Today I had the whole day off from work, and school still hasn't started back up. So I decided it was time to do a little bit of baking. I tried out 2 new exciting and unique recipes. The first was a tea cake, which pretty much is a "cake-in-a-cup". You remember those awesome cakes that came in a box that you could cook in the microwave, and that weren't actually good, and didn't even look appealing. Well here's a cake in a cup that taste good, and it looks so cute.


     Secondly I made a cookie bowl. I found this idea on Pinterest, and was so excited to try it. It worked out pretty good.

     First off before I give the recipes I have to show you this oddly insane boxed "cake-in-a-mug" I found online. It's Hilarious! You are suppose to make a cake a day in a cup and it will increase your breast size. I can't believe people actually fall for this.
     Tea Cakes
Ingredients:

* 4 T. self rising flour
* 4 T. caster sugar
* 2 T. cocoa powder
* 1 Medium egg
* 3 T. milk
* 3 T. vegetable oil
* a few drops of vanilla extract

1. Use a teacup that is microwaveable, and remember bigger is better!
2. Chop up the sugar in a food processor so that it is the consistency needed to make it caster sugar. Only pulse a few times. You do not want it to be as fine as powdered sugar.
3. Mix the flour, sugar, and cocoa in the teacup.
4. Add the egg and mix well.

5. Add the remainder of ingredients, and make sure that it is fully mixed. It will seem very liquidy, but that is fine.
6. Microwave on high for 4-5 minutes.
7. Let cool, and then frost as desired. I used wilton's frosting, and added 2 T. milk to the frosting to soften it up a little bit.
8. Enjoy!

     We pretended that Cameron was celebrating her birthday. It was fun, Cameron got all dressed up. and we sang the birthday song, and her favorite part is was when she got to blow out the candle.
                       
Cookie Bowls
Ingredients:

* Cookie Dough (I used pillsbury, but any kind of drop cookie will do)
* Non-stick cooking spray

1. Preheat oven. Pillsbury asked for 350 degrees, but I cooked it at 300 degrees. I was worried that it would cook faster, being thinned out on a muffin tin.
2. Cut up the cookie dough into 1/4 inch cookies, you may need to make it a little thicker, just depends.
3. Flatten the dough out into circles, make sure that it is large enough to cover the muffin tin "bumps" on the backside of the muffin tin. Remember to spray the backside of the muffin tin, but don't spray a large amount the cookie dough will slide off.
4. Place the dough around the muffin tin "bumps", but only let them run over the edge a little. The cookies will expand and run down the sides.


5. Bake, but check them 3-5 minutes earlier than the recommended baking time. Pillsbury suggested 15 minutes baking time, but I took the cookies out at 10 minutes.
6. Let them cool about 5 minutes.
7. The bowls should then pull right off the muffin tin.

8. Finally serve with ice-cream or with fruit. Yum-Oh!

Cute Cameron Moment: Lately Cameron has become afraid of the dark. She is constantly asking me to turn lights on, even when it is only slightly dark. So were outside tonight looking up at the stars, because it is probably one of the last nice days left before it becomes cold, and Cameron says, "Mommy I am scared. It is dark!" So I tell it is okay, and that it will be light again tomorrow. So I ask her, "Do you know why it gets dark outside?" and her adorable response is, "you need to turn the light on." I love little minds!


Sunday, January 8, 2012

Newest Addition to our Family!

         First off since this is my 1st official post I just wanted to say I am extremely excited to start this blog. I have been wanting to share all the crazy and awesome things that seem to happen in my family's life.

     My daughter, Cameron, happens to be one of the most obnoxious little girls out there, but with those big blue eyes, and curly locks I can't seem to stay mad at her.

Cameron, Jan. 8, 2012
     But on to "the newest addition to our family", which happens to be a new bathroom. Thanks to Garner Remodeling, who did a fantastic job of designing and renovating. 
 

garnet remodeling logo

Follow the link to check out their website!  http://www.garnerremodeling.com/


    Sadly we do not have before and after photos, but just image a delipidated hole. Well, slight exaggeration, but compared to the "Now", we feel like we should be eating caviar as we sip our cocktails in our extravagent powder room.


     Everything was gutted, and we got all new appliances, such as sink, bath, and toilet. The only thing that stayed was our large, built-in cabinet that was perfect for the size of our bathroom. Which, as you can tell, is extra-small. They built new doors for our cabinet to update the room a little.

     In this photo you can barely see the cabinet that was revamped to stand up to modern-day cabinets. I am still using all my old bathroom accessories such as shower curtain, and towels. I'm contemplating if I should change it up and add a little color. If anyone has any pointers, or added suggestions on what I could do to add a little pizazz, feel free to comment. Oh, and before anyone comments on the color of the walls I'll let you know I am planning on painting the walls some shade of blue in the near future. (Unless someone comes up with an amazing color scheme idea)


     I like the color scheme below. I would like to somehow incorporate this into the bathroom. When picking paint I get the pure enjoyment like I'm choosing a specialty latte at the local coffee shop all because of the quirky names the paint is given. (From Left to Right, Aqua Chiffon, Oceanside, Cathedral Gray, and Forsythia Blossom) http://www.housebeautiful.com/decorating/colors/popular-paint-colors


Notice the awesome tile work that lines the whole room even through the shower!


 And lastly for...
Recently Shelved:

"Crossed"
By: Ally Condie
     This is the 2nd installment to Condie's Matched series. I personally loved her first book, but Crossed was a little of a disappointment, but don't get me wrong. I would still read it, she adds in a few new characters that you won't want to miss.


 "Tris and Izzie"
   By: Mette Ivie Harrison
       Ahhh! Worst book that I have read in a long time. Do not waste your time. The idea of the story was great. I was originally so excited to read a modern retelling of the Arthurian German fairytale of Tristan and Isolde, but Harrison butchered it with her one-liners and her lack of detail. Cover is awesome though! This had so much potential.
Related Posts Plugin for WordPress, Blogger...